Showing posts with label crafts. Show all posts

Wednesday, November 7, 2012

French Script Paper Tabletop for the Holidays

 
Hi all, I wanted to share our most recent fun event with you.  We were lucky enough to be asked by St. Louis Homes and Lifestyles magazine to be a part of their annual holiday tabletop tour. We had to decorate a table and then give a little presentation about it every hour last Saturday.  The event raised money for Ranken Jordan so were were thrilled to participate.
 
The first thing we did was pick a theme.  This was so easy for us because our favorite holiday collection in the store is a french inspired theme with a lot of script paper elements.  How fun is it to decorate a tabletop with something unexpected like paper?
 Above-Eiffel tower box by Cody Foster and bird with script paper wings from Bethany Lowe.


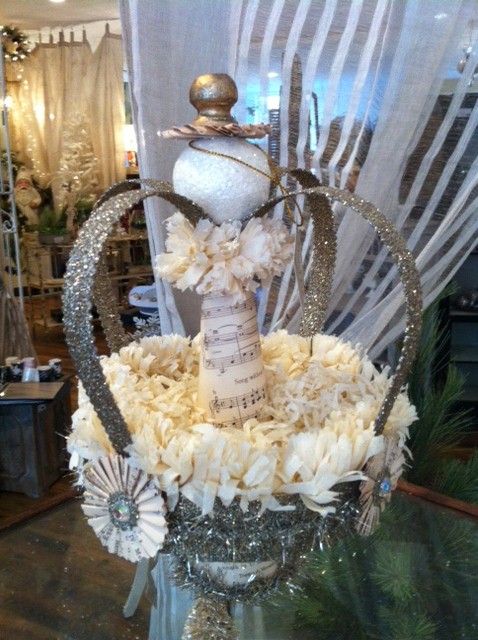
This treetopper/table decoration designed by Lesa Davis is another of our favorites.  It was definitely one of the main inspirations for the tabletop.
 
Our next task was to pick out a special treat for visitors, so Sarah came up with the idea to do a hot chocolate bar.  Here's the blog where she came up with the idea.
We made a huge batch of hot cocoa and got biscotti, peppermint bark, whipped cream, marshmallows, and peppermint flakes.  It was so fun!

 
Here is the actual tabletop that we came up with.  Since Emily worked on it more than any of us, we decided that she should do the presentations. 


More paper elements

 
 The runner in the picture below was just a piece of old burlap that Kristin made paper flowers for.  She just hot glued them onto the ends and voila!, we had an inexpensive runner that tied into the rest of the theme.  Don't be afraid to make little inexpensive creations like this!  If you add them to pieces you buy, it will look like you spent a lot more money than you did!
 The centerpiece of the table is a big mercury glass jar with some juniper sprigs and branches.  Emily clipped some of the script flowers onto the branches to match the flowers on the napkins.


Emily tied little wreaths with bows onto the back of each of the chairs around the table.  Aren't they darling?!  She used a ribbon with a script pattern so that they would tie into the theme.

She used little juniper berry sprigs that have just a touch of blue in them.  To tie in the blue with the table, she brought in some light blue napkins.  She used pine as a charger too.
 
Emily did a great job with the tabletop tour and we've had some wonderful customers tell us that it was their favorite one! I'm so glad we were able to participate this year and I hope we do it again next year!  What is your favorite part of the table?  We'd love to know!  -Lindsay
 
If you like anything you saw, you can get in on our website!  Here's a link to the holiday section of our site. http://thewhiterabbitstl.com/catalog.php?page=1&category=36

Friday, September 21, 2012

Our first workshop-Pumpkin decorating

We recently decided that it would be really fun to do little evening workshops where we demonstrate a craft or a technique.  Our first idea was a pumpkin decorating workshop.  We carry several sizes of white faux pumpkins which make a great pallette for all kinds of embellishments, so we knew we were going to use them.  There were 2 techniques we wanted to demonstrate.  One was using glue and glitter to make a swirl pattern and a monogram. The other was using a lacy pair of stockings to cover the pumpkin.  Here are the 2 prototypes we came up with.
The lace one was done by Sarah and the "K" was decorated by Kristin. Pretty impressive for a first try right? 


After making our prototypes, we determined the supplies we would need.  Tons of glitter, glue, sequins, and stockings were collected.  We got a huge response from the invitation we sent out, so we split the class into 2 sessions.  It was so great to know that people were excited to attend!


Sarah and Kristin also made pumpkin pie bars, cake pops, and apple spice cakes.  We bought champagne and oj for mimosas. (because drinking and crafting is always a good idea right?)
 
 
Here is everyone working on their creations.


And here are a few of the finished products!  I posted all of them on our Facebook page and I'm sending a little gift to whoever gets the most "likes" on their pumpkin.


We seriously had more fun doing the workshop than we had ever imagined.  It was great!  Everyone was so happy, and much to our surprise, talented!  There wasn't a single pumpkin that was ugly!  I mean, not that we expected ugly ones,but they were really all wonderful!
 Now we are brainstorming for future workshops.  Everyone was asking what we're doing for Christmas.  Maybe a wreath?  Maybe how to decorate a mantle?  Maybe an ornament?  Maybe all of the above!  Let me know if you have an idea!-Lindsay

Monday, August 27, 2012

Put a Little Glamour in Your Halloween

We are so thrilled with the look of our Halloween decor this year.  We ordered it in January and had a black, white, and tan theme in mind.  There are touches of orange and a little bit of glamour.
  Don't you just love the look of a classier Halloween? I don't understand why so much of the Halloween decor you see in stores is so cheesy. It's all plastic and shiny. Why can't Halloween be pretty AND spooky? 

We had these jeweled pumpkins last year and sold out of them instantly so we got several sets this year.
 
Old top hats are so cool for a Halloween table.  You can fill them with pumpkins or put them on top of a skeleton's head.  We used some hay to add a special touch to our top hat and pumpkin.
My favorite part about the pumpkins we sell is their twisty stems.  So cute!
 Susan from Knollwood Lane made some fun pennant banners with different images on them.  I love this BOO banner.
 We pretty much believe that you can never have too much glitter!  These are glass glitter pumpkins.  They are $8 and $12 each.


 I love the hanging witch in the moon.  She is so cool.  We ordered her from the Bethany Lowe showroom.

 
Halloween decor looks cool against the temporary wallpaper from my recent post. We made it even more glamorous looking by mixing in mercury glass and old silver like the tray and candleholders below.

 They're watching you....
 These boo blocks have been really popular because you can put them anywhere.


 I ordered the black candleabra for our display a long time ago.  I just knew it would be perfect!


Another cool Knollwood Lane creation.  Susan made door hangers like this skeleton one below.  I love the glass glitter.

 
People have been so tickled by these Ouji board placemats.  We've been collecting them for a few months so we'd have enough to make a whole table setting.
 We've also been collecting the white ironstone for our table.

Mr. Crow is wearing a crown.  He's so fancy. 
 
 These silhouette ornaments are really cool.  It's one of my favorite things we ordered this year.
 
 
This is a fun, inexpensive way to decorate for Halloween.  I bought one bag each of white lima beans, black beans, and black eyed peas.  You can fill jars in layers with them or use them to fill in around displays.

 
We can make you a gorgeous bow for your fall wreath this year.  Just stop in and we will help you pick the ribbon and make whatever size you need.


If you are in the St. Louis area, I hope you can come in and see the Halloween displays in person.  We will be happy to help you pick out the right pieces for your mantel, table, cabinet, or front door.  We can always ship things too!  Just give us a call at 314-963-9784 and let us know what you saw on here that you want.  I'll send it right out.

We are working on planning a pumpkin decorating workshop for September too!  I can't wait!  I'll post about that when we figure out the details.

Wednesday, August 15, 2012

We tested some temporary wallpaper-Here's what we found

 Hi everyone!  I posted about the temporary wallpaper we found at market earlier and I promised to give everyone an update once we tried it, so here it is! 

So here are the basics the company gave us when we ordered:
  1.  1 roll is 20.5" x 33" and covers 56.37 sq ft. 
  2.  It works best on an eggshell or satin painted finish. 
  3. You can use it on walls, doors, tiles, furniture, or craft projects. 
  4.  It is repostitionable.
  5. It has a sticky backing so there is no need for glue.


 Here is Sarah smoothing the bubbles out of the paper.

Here's what we found after actually trying it out:
  1.   It really is repostitionable!  It was easy to pull it off and re-stick it if you make a mistake. It stayed sticky.
  2. It's best to use a sharp xacto knife to cut it. Scissors left an uneven edge because they catch on it.
  3. There's a little bit of a learning curve. Sarah says by the 3rd strip, she was quick and got it lined up without bubbles the first time.  It took her about an hour to do this project.
  4. It really would be best for an accent wall or a strip on a large wall(which is what we did)  Part of the reason is, when we were trying to hang a big mirror on it, it tore a little which makes us worry that if it was on all of your walls, it would get bumped by furniture.
  5. It looks high quality.  We are very happy with the "look" of it and the impact that it gave on our wall.


Here she is lining up the 3rd strip with the other 2.


Doesn't it look cool!?!  We kind of love it!

Below are some of the patterns we ordered already but we can order any of the designs for a customer, one roll at a time.  A roll is from $75-$95 depending on the pattern.  Just to give you an idea of how much it covers, if you have 10ft ceilings and a 10ft wall, you'd need 2 rolls to cover the whole wall.


Well, there ya have it.  Temporary wallpaper makes a big impact and is fairly easy to use.  We would use it for an accent wall or a strip in the center of a focal point or for crafty things.  Let us know if you have questions and when we give it a try on a piece of furniture, I'll post again. Oh, and if you want to purchase some, I'll be happy to help you!